April 30, 2009

Mommies Day

We're seeing our mommies this weekend, and most likely not for actual Mother's Day, so I made their presents early.

Mother's Day 09 - herb bee

In school, Lara made this amazing collage bee - seriously, how cute is this thing? - and I photoshopped it into it into a little grass and flower scene. For a while now, I've been drying the herbs we get from our farm share, so I got some spice jars and crushed up some of the dried parsley, thyme, dill, and rosemary into them. I printed some labels on sticky paper, et voila!

Mother's Day 09 - herb bottles

And finally, all wrapped up.

Mother's Day 09 - herbs wrapped up

April 28, 2009

Changes


We recently moved Lara from a crib into a big-girl bed. And when I say moved, what I mean is that we contemplated going to IKEA to get a low twin, decided that the effort to get one, bring it home, and rearrange all the furniture in her room to accommodate it was too tiring to even think about... so we just took one of the sides off of her crib, put it into storage, and I sewed her a little pillow and case. Is three and a half late to make the switch? Well, we were worried about what would happen once she knew she could escape the bed at will. We were anxious that naps would fly out the window, and that rebellion would ensue. After all, we thought, she never really climbed out of the crib, so what's the rush?

Turns out we needn't have worried. It took one day for her to fall in love with her new little bed. She sleeps in it fine. She naps. She escapes only a few times just after bedtime with a smiling mischievous face that I love (I have to hide my giggles in my attempts to be stern).

April 23, 2009

New Baby Zone!

Whoo-hoo! Today I finished putting together a little nook for the new baby in our bedroom.

New Baby Zone 1

So many things in the picture are handmande:

- the crib is a Lara-beaten portable crib that I repainted that cheery green color
- I sewed the crib sheets myself from super-soft jersey (far softer than whatever I could find premade)
- I sewed the changing table pad covers myself also - the pad is from IKEA and is an odd size that just fits on the little bookshelf, but is too small for standard covers
- the changing table and its handmade fabric-covered boxes you may recognize from this post
- I reoiled all the hinges on the all rooms in the bedroom (which you obviously can't see in a picture, but it took a long time and so I get to mention it as yet another thing I hand-did!)

New Baby Zone 2

A closeup of the artwork hanging above the crib. I like how the artwork is an inch or so out from the wall and thus functions as a kind of mobile. I used two willow branches and some recycled ribbons to hang up artwork that is mostly from Etsy. The collage all the way on the right is made by me, however. Yay! This little corner makes me happy.

April 20, 2009

Found at the Park

pink and white branch

tree against sky

heart shaped moss

---------------------------

For some reason I haven't been feeling very verbal in this space recently... Bear with me - I'm sure the muse will visit soon.

April 18, 2009

A Peek at Summer

We've had a couple of days of early summer here, which sadly won't last, but which happily we've been taking full advantage of! It is just gorgeous outside - the kind of weather that sounds trite when described. The trees are hovering between spring and summer, branches covered in slowly fading flowers and newly emerging leaves at the same time. It's warm, but not yet humid; birds chirp, but insects are not yet buzzing. In a word - perfect.


April 13, 2009

No-Sew Fabric-Covered Boxes Tutorial

Blue changing table shelf

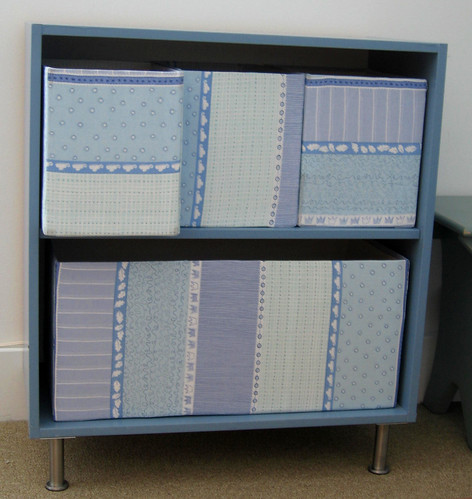
I upcycled an old Ikea bookshelf (Misha had this in his childhood bedroom!) into a little changing table. It was too low to the ground, so I added some Capita legs from Ikea to raise it about 5 inches. Then I went to a store to buy some boxes or baskets for the shelves and saw that they apparently cost thirty bucks a pop. I know, seriously. So made some custom-sized boxes, three on top, and one large one for the bottom. Here's how:

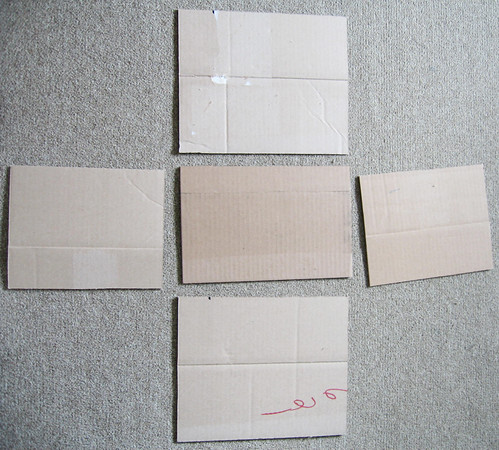
Step 1: Measure and cut cardboard for your box. Use a T-square or similar tool for right-angled corners. If you're going to pick a step in which to be the most anal, it's this one - if you're off even by a quarter of a inch with your measurements, your box will not be rectangular.

Step 1

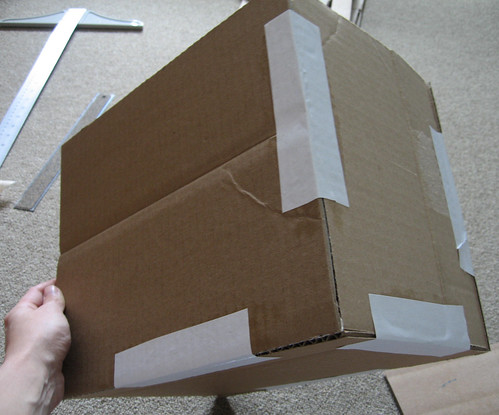
Step 2: Cut 8 strips of white paper per box you are making, each about 7"x3". Using a regular white glue (or even a glue stick), use these strips to attach the cardboard sides and bottom to each other. Be careful when lining up the edges to create crisp corners.

Step 2

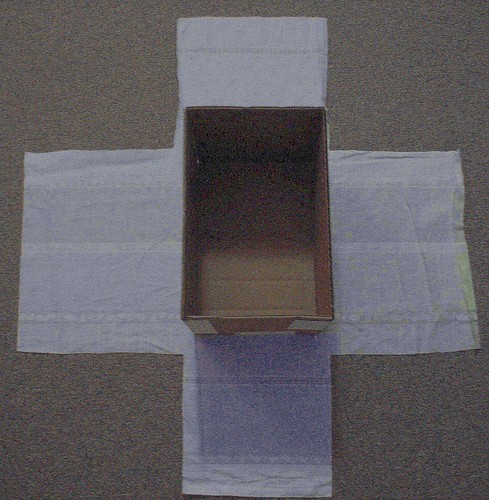
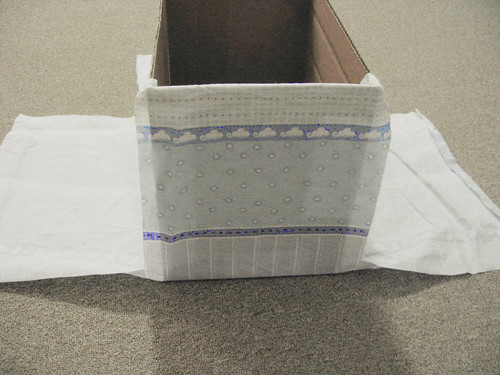
Step 3: Put your box on top of the fabric you will be using to cover its outside. Cut a plus-sign shaped piece out, large enough to cover your box measurements, plus about a 2 inch margin on each side. Don't worry about being exact with straight edges here - the fabric edges will be invisible in the final product. (Also, I really don't know what happened to this photo - I swear I wasn't using night-vision goggles to take it...)

Step 3

Step 4: Start covering the box. Run a thin line of strong white glue (I used Gem-Tac) about an inch below the inside edge of one of the box sides. Fold up the corresponding part of the fabric and adhere. When dry, do the same to the opposite box side, making sure to pull the fabric taut in order to smooth out any wrinkles. When dry, run a thin line of glue down about an inch from the edge of one of the box sides not yet covered with fabric. Pull the margin of the fabric piece already attached to the inside taut and glue it down. Repeat on the three remaining margins.

Step 4

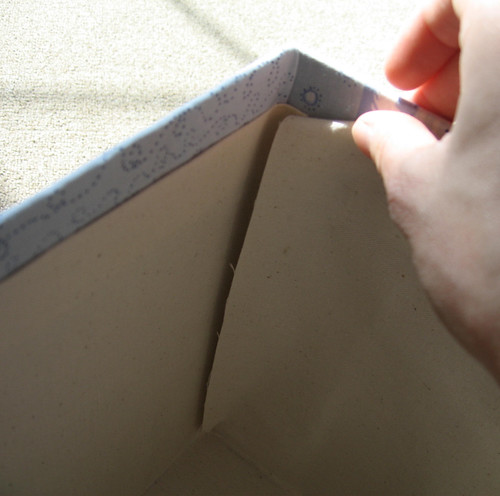
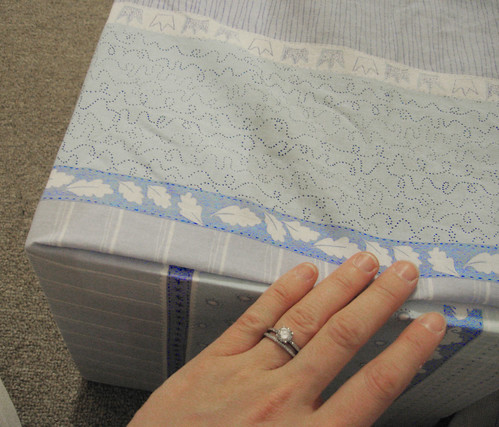
Step 5: Time to do cover the two remaining outer sides. Run a thin 3" line of glue about an inch below the inside edge of an uncovered side, in the middle. Pull fabric taut and glue down. Then, fold the margin of the fabric in on itself, creating a sharp corner like in the photo below.

Step 5

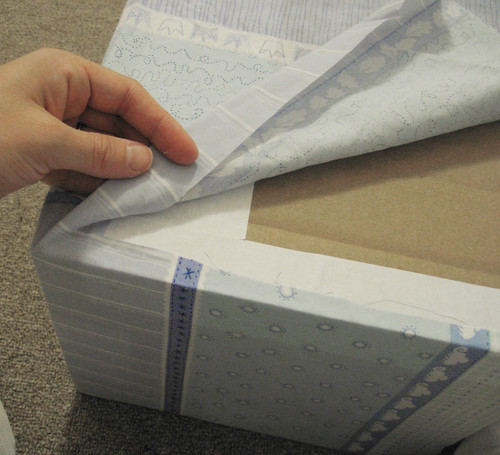
Step 6: Run a line of glue down the entire outside edge (as close as possible to the edge) where you just folded down the margin. Glue the fabric down, creating a nice seam. Wipe any excess glue that comes out along the edge - since you are using a white glue, it will dry clear. Repeat for the other side of the piece of fabric, then twice on the last box side.

Step 6

Step 7: Cut fabric for the inside. This time, make sure the measurements of the plus-sign shaped piece you cut out are exactly those of the box itself. I recommend a heavier, canvas-like fabric for the inside - it will be easier to work with.

Step 7

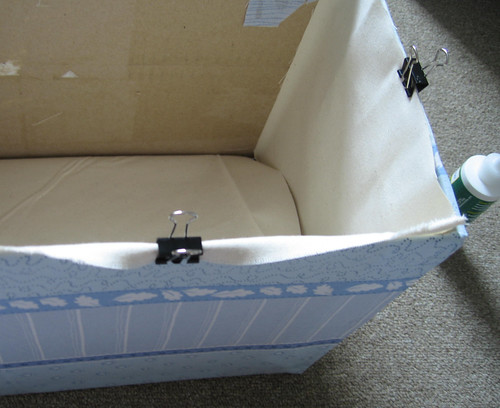
Step 8: Use binder clips to keep the unglued fabric out of your way as your work on the inside. Run a thin line of glue along an inside bottom edge and glue down the fabric. Repeat on all four sides along the bottom, smoothing out the fabric as you glue. Then run lines of glue along the side edges, folding the fabric in about 1/4" in order to create a seam.

Step 8

Step 9: Finally, fold the top fabric edge in about 1/2" and run lines of glue along the inside box edges about 1/2" from the top, gluing down the inside fabric. Voila! Let it dry overnight before using.

Step 9

April 12, 2009

Passover

A lovely night, a beautiful seder, and a really fun game of poker to round out the night.

Lara wore her new little dress and the duck sweater that has now become a shrug with three-quarter length sleeves. Have I mentioned that she just learned how to button?


Also that she is a jigsaw puzzle master? She put this whole one together without help. We're buying them by the pound at the rate she is going.


Meanwhile, my multi-talented sister-in-law made all sorts of fancy seder food including this beautiful dessert - stewed berries with mascarpone in a balsamic vinegar reduction:

April 9, 2009

Ladybug Lunch Bag

Lara's ladybug lunch bag

I made Lara a new bag for lunch since her old store-bought one disintegrated. This one is about as wonky as the photo makes it look, mostly because I put felt between the outside and lining layers for insulation. Still, she likes it - mostly because it says "Lara" on it - so I guess that's all that matters!

Happy Passover, everyone - we're off for the weekend! Stay tuned next week - I've got a new tutorial all ready to go on how to convert a bookshelf to a changing table, and how to make fabric-covered boxes in the process.

April 8, 2009

Zoo Days

Fun day at the zoo!


With Matt on the bear statue


Riding the pony horsie (am I biased or does she look great up on that horse? We do live right near equestrian country...)


Strolling around. I really like the shadow in this shot. Mr. Forty-two Roads takes great pictures.

April 7, 2009

Tee Ball

We signed Lara up for tee ball this spring. Exactly how cute are a bunch of three year olds running around playing baseball? I don't think there's words. Lara loves being a Bumblebee so far (one weekend in), but her interest is primarily sartorial - and really, who can resist this awesome uniform?


Sadly, Gus is not just on a different team, he's on a whole different field! But on opening day they got to see each other a little bit.


Lara pensively studies the field to determine her batting strategy...


... which for her turns out to be remedial batting practice with Coach Mike. Are we bad parents because she has never seen baseball played and thus had no idea how to hold the bat? What worked best was to tell her it was just like hitting the pinata at Gus's house, but I think she was sad to see that no candy came out of the wiffle ball.

------------------------------

Thank you so much for the birthday wishes, everyone, but I think I was too cryptic. Lara's third birthday was in November. The little bag I made was for our friend Juliet who just turned three.

April 3, 2009

On a rainy yucky day, there's nowhere to go but the Please Touch Museum. Here is Lara modeling her lovely rain coat. Can you tell she wasn't all that into modeling this morning? (Oh, and also? This is the first time I've been able to get her to accept the necessity of a hair clip when her hair is down. Usually she just rips it out as soon as I put one in.)


We mostly hung out in the Alice in Wonderland forest. There is a really great maze of optical illusions there (concave and convex mirrors, hallways built at a slight incline that make it look like they are shrinking as you walk through them, etc.) and Lara was totally freaked out by it today, pretty much for the first time. I guess that means she's starting to get them? We settled for a tea party and a ride on the Dodo.