Showing posts with label House. Show all posts

April 7, 2016

New Faucet!

The things-to-fix-around-the-house list keep getting smaller and smaller! Recently, we replaced our master bathroom toilet and faucet, both of which dated from 1953! And both of which were only just now starting to function imperfectly! So, in all seriousness - well done making durable things, 1950s America. Color us impressed. This is what this faucet to end all faucets looked like (basically, your standard two-handled dealie):


We replaced it with this Delta faucet. I decided to go with Delta because we replaced our kitchen faucet with a Delta a couple of years ago and haven't had any issues.

My only caveat about buying faucets is to watch out for the ones from Lowes or Home Depot - they carry same brand/same model name ones that have plastic instead of metal/ceramic parts, so while they are seductively cheaper, you're getting an inferior product.


I love how it immediately modernizes our whole sink! Amazing.


This was a pretty fun weekend project. And by "pretty fun" I mean that we decided ahead of time that would be ok to throw in the towel if we needed to - which is probably why we didn't end up throwing any towels at all! We did however run into the same issue we faced when replacing the kitchen sink. Namely: that the nut holding the faucet in place was frozen and immovable. In both cases, we ended up using our Dremel (we have just this very basic one and it is fine for most things) to saw it off:


Except this time, we got to the "well, might as well saw it off" decision within 10 minutes of not being able to shift the nut, whereas our kitchen was a two-day sink nut battle royale. We're learnding!

March 18, 2016

Desk Air Plants

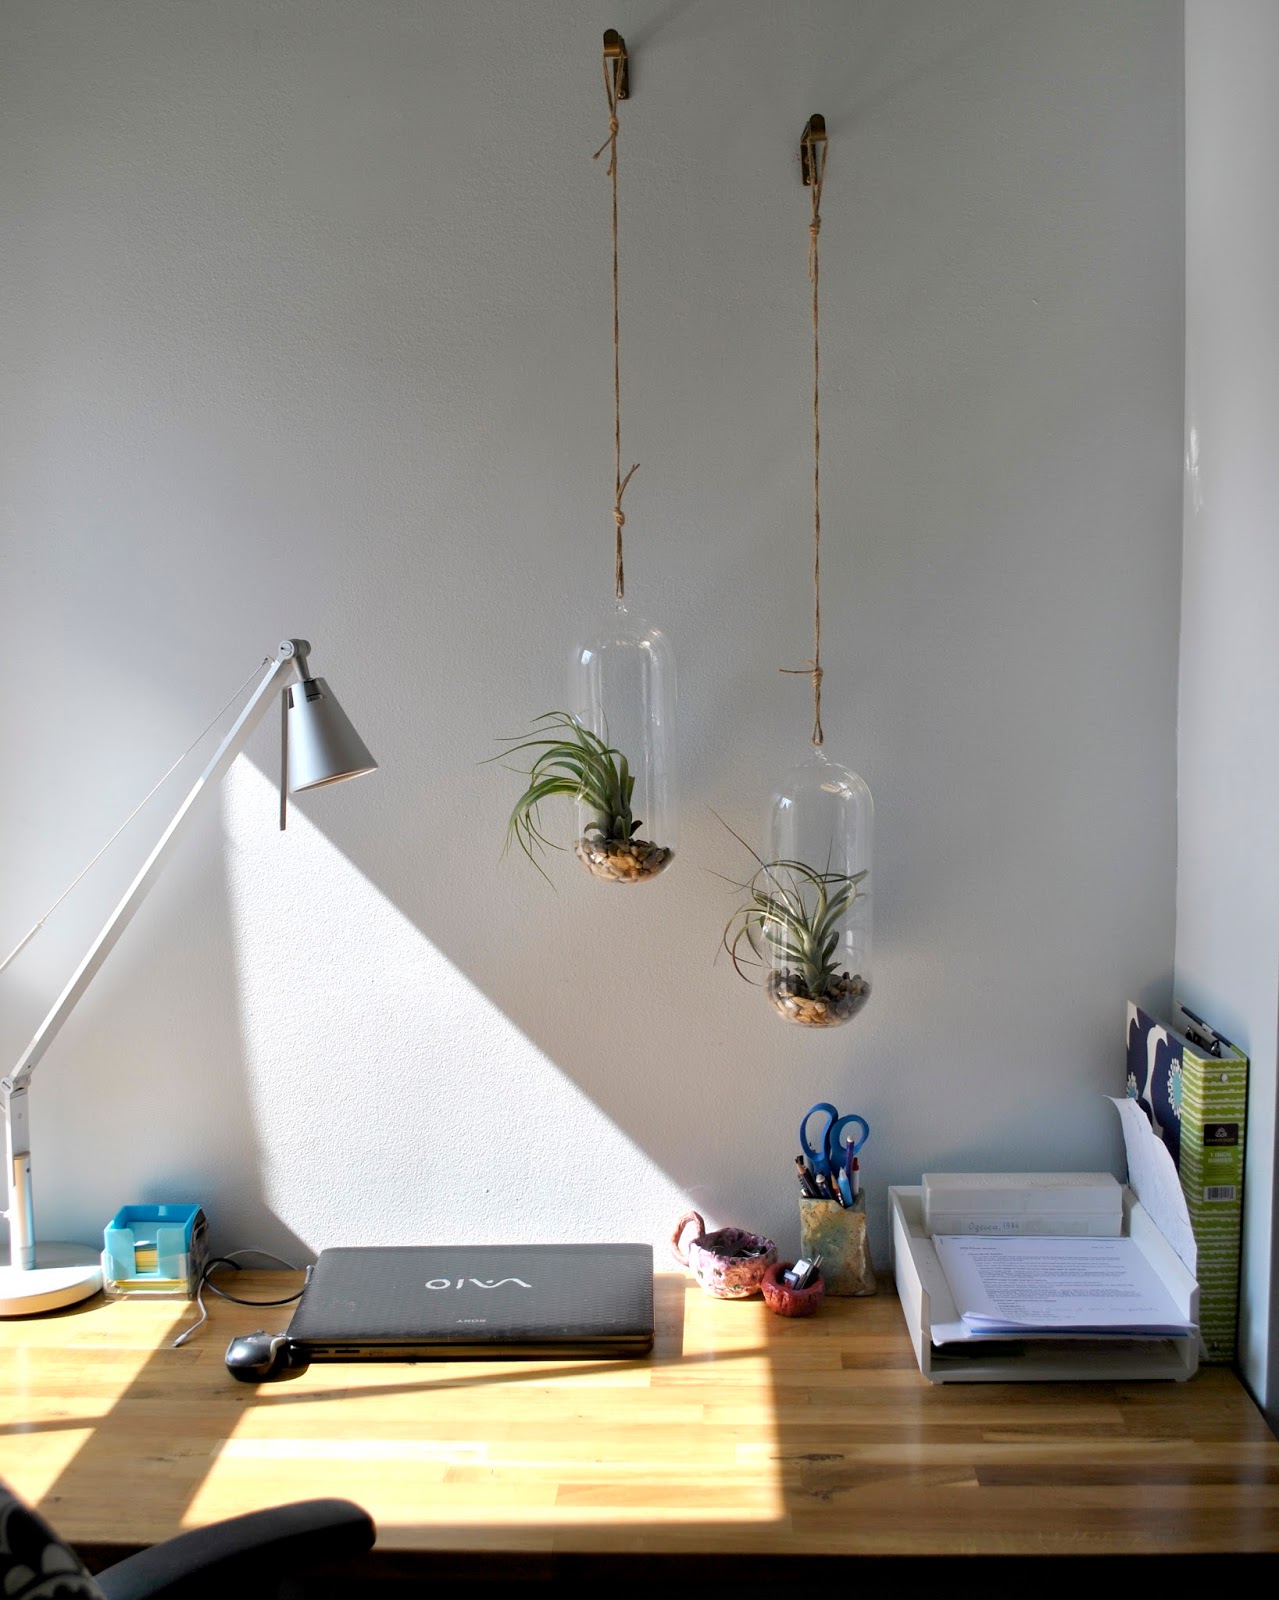
After visiting a friend's lovely house, Mr. Forty-two Roads came home raving about her use of glass terraria and suspended greenery. Ever since then, he's been really into the idea of replicating this somewhere in our house. But... our house has two rather rambunctious children, whose main response to dangling glass orbs would be to smash into them while running around. The out of the way solution? Our bedroom office nook, which now features this lovely hanging tableau:


These plants are two different kinds of Tillandsia, which just need a daily spritz of water to thrive. They are hanging from curtain rod hooks, which seem perfectly designed to hold a suspended weight.


I did research knots to find a particularly sturdy one, ending up tying twine into double figure 8 knots on both ends. This knot is strong and useful for not putting undue strain on a rope while anchoring it.

February 28, 2016

DIY Shade for a Wall Sconce


Recently, I decided to make a list of all the little annoying things in our house that have been bothering me. Instead of being irritated by them each time I saw them, why not simply tackle one every few days or so? It sounds so basic when I write it here, but for some reason the concept of a project-to-do-small-projects has eluded me until now. But suddenly, instead of internally grumbling to myself about entropy and everything falling apart, I can just add a line item to the list! And just like that - clarity. It's not that "everything is falling apart" - it's that this one panel in this one door has a crack that can easily be caulked.

Project #1 was to add a shade to the bare-bulb sconce that is on our first floor landing. The light is in a great place, and does some heavy duty illumination in our living room, so the shade had to be as translucent as possible. I also wanted to get as far away from the original shade as possible (the sconce started with a very dark orange glass shade that was hideous and that one day fell and broke into a million billion pieces).


My first thought was Amazon - but no dice. The market for half-shades that are held on by the bulb is scant, apparently. It was time to improvise! I used some 13-gauge wire to create a basic frame and the circle that would fit onto the socket.


The shade itself? This IKEA placemat, strategically wrapped around the frame and secured with a few wire twists.


So now we have a reasonably sculptural shade that hides the bulb without compromising light quality.


Here is a schematic for the wire frame. The light blue squiggles are the places where I used a very thin wire to secure the heavier wire either to itself, or to the middle socket-holder piece.


Of course, there's also the option to spray paint the whole thing a bright color. Maybe one day, when it ends back up on the "things bothering me" list!

March 3, 2015

The Office is Gone, Long Live Jake's Bedroom

This weekend was very exciting in the forty-two roads household - Jake officially moved into his own bedroom! Of course that room used to be the office, and part of the challenge was figuring out how to decamp from the giant sprawling 8 foot desk and consolidate our office needs into our bedroom. My solution? After searching high and low for something that would fit, I realized that I could simply create a custom-fitted desk that fits perfectly in a nook by a window:


It is most built from IKEA parts, but removing the existing drawer fronts and cutting new ones out of maple plywood and adding nice bar handles (thanks, Nancy!) really gave the whole thing a more expensive vibe. The table top is a really pretty piece of butcher block which I successfully cut by myself with only a power jig saw. It was... probably not the most appropriate tool for the job. But on the plus side I have a really great sense of how to handle that thing well now!


Once I had cut and sanded the plywood to the right dimensions - well, actually about 1/8" smaller to highlight the look of the eased edges more - I super carefully measured and created all the same holes and things that IKEA uses on the obverse side so that I could just attach them with the existing screws and dowels. The main issue was creating a channel for the drawer bottom to fit into. Since I don't have a router, I just used one of the carving heads on my Dremel. The result is wonky but totally functional, and basically invisible since the drawer bottom now covers my not-totally-straight carving job. Here is a closeup of the drawer unit:


(Oh, and a tip - IKEA's website only has the Alex with narrow drawers, but in stores they have the Alex we actually got, with a hanging file system in the bottom.)

February 11, 2015

Bamboo...zled

Ok, so, over the past year we just might have developed some kind of small tiny issue with one of the basement walls:


Yeah. That is indeed a picture of all the paint and plaster just falling off that wall in sheets because of an incredibly small amount of unstoppable moisture coming in from who knows where. Finding the source would probably mean having to take apart our entire house, since this is a center wall that is shared with a neighbor who is experiencing none of this on their side.

On the plus side, once all the plaster fell down, we realized that now that the wall was exposed to the air, whatever moisture was being trapped under plaster was simply able to evaporate without causing any more problems. But on the minus side, it looked like a wall where all the plaster had fallen down. Our solution? Cover the wall with something that wasn't airtight and wouldn't actually touch the wall.

First, I put up a few waterproof 1"x3"s (I think they are usually used as outdoor trim):


And over them went a layer of this bamboo wall covering,which comes in 4 by 8 foot sheets with a nylon mesh backing:


Here's a view looking down the stairs:


Problem solved, if I do say so myself!

January 23, 2015

The Darling Buds of... January?

So, much like the summer whose lease hath all too short a date, our office chairs have recently also fallen way out of bloom. What started as a fresh, bright upholstery job of chartreuse leaves on a crisp white background, after 8 or years turned into a brown faded mess riddled with holes. I mean, seriously - this is not cool:

So it was staple gun, screw driver (for prying mostly), and most importantly fun new fabric to the rescue!

Of course I now realize I failed to capture this in photographic form, but I do love how the graphic black and white really complements the pattern of the radiator cover in this room (you can see a bit of it in the "before" picture).

October 24, 2014

Two Lofts are Better than One

I finally got around to taking pictures of the kids' double loft room! They've been enjoying it for 2 months or so now, long enough for the discussion to segue into the separate rooms conundrum. But still, right now, here is what it looks like:


We went with the cool color scheme the kids had worked out (you can see it in the initial plans we talked about here), with Lara getting a purple square and Jake getting a blue one. How did I work out "squares" when neither the walls nor the ceiling in that room are at all plumb? Through a lot of eyeballing, basically. I found that lining things up with the windows made more visual sense than lining them up with the ceiling and walls, and then I fudged a half inch over several feet here and there to make everything connect without too much obvious distortion.

Lara's new loft bed came with the desk and shelves as one unit, but Jake's loft didn't have any built-in storage. So, I whipped up a matching set of square shelves by surrounding a cheapie Kraftmaid cabinet that happened to have almost the exact right dimensions with some lumber. With some stain and matte polyurethane, you honestly would never know that it wasn't part of that bed originally:


Also, look - fairy lights under each loft! For some reason I have been obsessed with having these things around a bed since childhood. I remember really wanting to have twinkle light around my bed even in high school. Why on earth did I not make this rather easily attainable dream come true until now (for someone else!)? No idea. I remember vaguely worrying that they were too frivolous or something. Basically, apparently I was a very silly person.

August 7, 2014

Big Changes

Well, it looks like the time of bunk beds has come to an end. Or rather, the time of someone sleeping in a lower bunk bed is pretty much over... because the kids are getting loft beds! This will call for a total shakeup of their room, and they are so excitedly on board with the whole "we get our own desks and don't have to share!" phenomenon.

Right now their room looks like this. And I mean, literally right now - that's right, I didn't even feel like picking the stuffed animals up off the floor (or initiating a battle to get them to do it...) before taking this picture:


But in the future, we will create an oasis of awesomeness that right now can only be suggested by my wham-bam Photoshop skills. After adding a loft bed with a built in desk for Lara, and taking the bottom bunk off the existing loft bed for Jake, we will basically be splitting their room in half visually. To add some flair, Jake wants his area to be blue and Lara opted for hers to be purple. The question then remains: what color should the rest of the walls be?

Blue?


Gray?


Or taupe/beige?


Right now, our money is on this nice warm gray, which I'm sure will be extremely easy to find, since from everything I hear, all gray paint is super cooperative and looks just like you would expect it to. What do you think?

April 2, 2014

Hiding the Meter

After our basement renovation, I had sort of mentally tabled the weirdness on the basement bathroom wall.


There was no particularly appealing way to hide those utility doodads, so I decided to accept our contractor's "Let's put a white frame around them!" solution with a shrug, and figured we would eventually figure something else out later. The main complexity was working around the way that the gas meter juts out of the wall a full 3.5 inches, which basically meant that the standard solution of "large art" wasn't really going to work - at least, not off the shelf.

So, now it is later and we have indeed solved the dilemma! I bought stretcher bars, stretched a big canvas over them, made a masking tape grid over it, and the kids and I whipped up... let's say a tribute in equal parts to Mondrian and Joseph's amazing technicolor dreamcoat.

But this is not actually the solution - the key to that lies in the way I framed our painting. I used 1x4 pieces of lumber to construct a basic frame (the kids helped me glue, hammer, and stain the wood!). Then, I attached the painting as near the front edge as possible (inset only 1/4" or so). This left enough space for the gas meter to be hidden behind the canvas. And now our bathroom is a little less factory-chic and a little more rock and roll.


October 2, 2013

Pedal Power

So, our super nice neighbor just gave Mr. Forty-Two Roads a bike. It's a nice sturdy little mountain bike, and hello - it's free! Basically? Super awesome.

Not as awesome, though? Our neighbor had spray painted the whole thing a matte gray color - I think for theft-prevention purposes. The grey was not all that great-looking to begin with, and it had really chipped away in a lot of places, which made it even less appealing to the eyes. Imagine this, but all over:


But, not to worry, because - acetone to the rescue! Acetone is really great at getting spray paint off non-porous surfaces, with just a little bit of elbow grease. Check out the cute bike now that it's been restored to its former glory:


Now we just need a rack for the car...

September 6, 2013

Floating Desk Nook


What do you do with an odd little bumpout in the corner of a room? Well, if you are me, you at first daydream about the possibilities of a quaint and charming window seat. But then you quickly come to your senses and realize there are already quite a few various reading spots all over the house and this one would not be nearly as comfy as the plop-worthy couch. And also? A second grader could really use a desk - a real desk, one that isn't primarily an art table.


After a bunch of research, you add some cleats to the wall to support the floating desk, making sure to anchor them deeply in studs on one side and masonry on the other (because your house is old and so is a mixed bag when it comes to wall materials).


Then you measure the walls and realize that not only are there no right angles, but there aren't even straight flat spaces... and so you cut your tabletop and shelves with curved sides. Then you fill the remaining gaps with some paintable caulk, which is only ever your friend.


Three coats of paint, two coats of poly, a chair, and a lamp later? You've got yourself some very happy kids all excited about their new desk nook! Here it is again:

May 2, 2013

Following the Brick Road

So: true confessions time. Sometimes, I start huge random projects that really don't - on the face of it - need to be happening. (Psychoanalyze at will.) Case in point - there was nothing particularly horrible about the way the bricks were laid out in our back yard. Sure, they were in an awkwardly spaced basketweave pattern with almost an inch of dirt around each brick. And yes, that dirt would find its way up and out constantly, but would stubbornly refuse to grow moss on it.


But still, did I really need to pull up all the bricks and start over? Probably not. And yet, that is pretty much exactly what I did. Using all the awesomely patinaed bricks that were already there, plus an extra 60 or so free from Craigslist (because guess what? When you eliminate all the dirt space, you need extra bricks!), I went to town.

Here's a shot of the naturally occurring before and after effect of redoing everything row by row:


I started in March, and yesterday I finally finished. Phew! That is some ridiculously hard garden labor. But look how pretty and clean-looking it is now!


The original plan was to also uproot all the bricks in the way back area of the garden and make that a grass lawn... but that will have to wait until fall apparently, according to my quick research of when you're supposed to plant grass seeds. Any tips on making that process go smoothly?

April 15, 2013

Underground Art


Hooray, hooray, say mom and dad.
You wonder - wherefore are they glad?
Why 'tis that down below their pad
There's now an art space, lush and rad.
A brand new space for girl and lad
To draw, to paint, in stripe or plaid -
And keep their mess away. Not bad!


(Made from a tabletop and table-attached shelf from IKEA and tapered legs from Home Depot cut to about 22". Assembled by a crackerjack team of small children wielding power tools. After seeing that photo of the 11 month old hacking some fruit open with a machete, I decided it's never to early to start learning to keep your fingers away from sharp rotating objects.)

April 12, 2013

For the Birds

Well, it looks like the birds in our back yard have finally wised up. I hung two feeders from the tree branches a couple of weeks ago, and they have fed nothing but squirrels since then. Have you ever seen Cirque du Soleil? Those acrobats have got nothing on the ridiculous stunts the squirrels have been pulling to get into these things. Like, full-on upside-down one-handed dangling contortionist trapeze nonsense. But this morning, I walked out to find:


Ta-da! An actual bird! Excellent. Now fly down and start eating all those delicious mosquito larvae that are no doubt getting ready to torment us all summer.

April 10, 2013

The Dresser Finds Its Place

At first we thought we would do it ourselves. How hard could it be? We're strong - and plus we just carried it in from the Zip-truck! And come on - just three flights of stairs? It's not like it's a solid wooden piece of furniture that does not come apart in any way... oh, wait. Yes, it is.

And that was the end of the carry-the-dresser-upstairs-by-ourselves adventure. And I freely admit that I was the weak link in the scenario, and so I was the one who ended up calling the nice people at Broad Street Movers (our go-to moving company). They had dudes over within the hour and it took them... oh, I'd say all of 6 minutes to super-gently deposit the dresser where we wanted it to go.

And then I went out and bought a plant to be its friend and companion:


Oh, and summer weather = summer blanket. Yay!

April 3, 2013

Dresser Re-dress!

Ok - after 9 months of trolling Craigslist for a new dresser to replace the IKEA workhorse that has seen us through three moves and is now thus merely a shadow of its former self, I got lucky. Super lucky. Might I even say, crazy lucky? Seriously, you guys - check out this amazing $225 dresser, and then feel even happier that its former owner was a totally delightful person to deal with:


Ah, but that is after a day of scrubbing and restoring and buffing and waxing the wood to bring the glory back. It was in excellent shape, and survived its trip back to our house in the bed of a Zipcar-ed pickup quite well. But still. Scratches, nicks, heat rings, and a little dust were obscuring the full beauty here.


Here's a shot-to-shot comparison of the before:


... and the after (after a little vinegar, super-fine steel wool, Magic Eraser, and Howard's cleaner and wax):


All the shine! And that wood grain! And all those different inlays and veneers!


And the carved legs? And the casters?


Now, to get it up three flights of stairs...